Wednesday, 24 February 2016

UFO sewing,Burda 6855 again,recycle, sewing sideways and inspiration. All in one!

Burda 6855 again was almost bound to be another UFO but I gathered up the will and somehow got them done. I'm so glad I did. They fit perfect and I know I will wear them often.
Okay- things got so out of control in the sewing room, I couldn't even find my cutting table! Every time I wanted to work on some thing I had to move my cutting mat off the table which was piled high with this project. All the prep work was done, I just had to hunker down. It just seemed too daunting. All that top stitching and a zip and rivets......bla! When in the beginning I had so much enthusiasm.
I had been inspired by this lady's pair of pants. I snapped a pic when she was heading out the door of my fave fabric store- Fabricana. What I liked was the camo fabric mixed with denim.
 
I had a pair of Miss Me camo linen shorts that I wore for years.... I loved them but some how they grew about 4 sizes to small for me and yet I still could not bare to throw them out. I knew I wanted to recycle them so this was my new brain wave.

I've made this pattern a few times so I knew it would fit. I used a medium/heavy weight stretch denim that I've had for eons. The camo shorts were mostly pockets and the larger portions were quite thread bare so I had to settle for small details with the linen.

I added a strip to one back pocket and used a fancy stitch to applique it on.


Lola motivated me by keeping a watchful eye on things.


It's difficult to make perfect top stitching when she has to sit on everything while I'm working....wouldn't have it any other way!

As I mentioned there was not a lot of fabric. I really wanted a camo cuff like my inspiration lady's. No such luck. What I did manage was to cover up the white serger thread on the roll ups.

I had already sewn up the legs and top stitched at this point, so how was I going to do this? Then I remembered I had this sideways sewing ( multi directional) feature on my machine. Bingo! That worked well.
I Camoed a few random belt loops with fancy stitching. And added a useless decorative tab to one pocket,
.

Popped on a few rivets while watching the Grammys.

Snap closure. Done.

Additions- I added a non stretch tummy panel. Helps to hold it in. I used 1/4 inch seam allowances on the waist band to make it wider.
The only things I wished I would have done was two rows of top stitching on the back pockets and added a coin pocket with rivets to the front. Now I'm just being lazy.
Jeans can be hard work but worth it in the end. This project felt very rewarding.
 
Thanks for stopping by.
Maureen.


Sunday, 21 February 2016

Night shirt to day tank. A refashion.

The other day my sister gave me this little night gown. At least I think that's what it was. Anyways, it didn't fit me but it was good quality fabric and I liked the lace on it. So I thought I'd flip it into something I would wear.

To start, I cut off the lace on the top.

Then I gave it a good pressing, making sure the side seams matched up. Once pressed I found the center front and back and marked them with a chalk line.

Using a TNT tank pattern I traced back and front lining up at the under arm seams.

This is what it looked like cut out. All that needed to be done was to stitch up the shoulders. I used the serger.

                          Didn't even have to mess around with anything below the arm holes.                                                      

The edges were pressed under 1/2 an inch then finished off with a narrow cover stitch.

Ta-Da! Fits beautifully, and now I will wear this - if it ever stops raining in Vancouver:)


Thanks for stopping by.


Tuesday, 1 September 2015

MAGAM September

The theme this month is Snoop Sewing

And snoop sewing means.....too snoop around in stores and find some inspiration to copy.
As luck would have it, early this spring I broke my RTW fast and bought a crazy patchy sweater that I just loved. I rationalized the purchase because I told myself it would be almost the same price as buying a pattern and making it myself. The sweater was 35$ and the last Vogue pattern that I bought- not on sale was, 35$.
This is the sweater. It may not look like much on the hanger but I think it's very cool and interesting with all the different fabrics and textures mixed together. All the seaming is serged on the outside.
The first day I wore it to work, one of my co-workers asked me if I paid 200$ for it. Apparently she had just seen it in a little boutique for that price!
This summer I visited a girlfriend in Calgary. I haven't seen in over 10 years as she has been living out of the country. As the evening chilled off she slipped on this little number and I thought to myself- why was she in my suitcase? Then I realized I hadn't brought my sweater with me - She owned the very same one! We had a good laugh.
It's nice to know I'm not the only one with different taste.
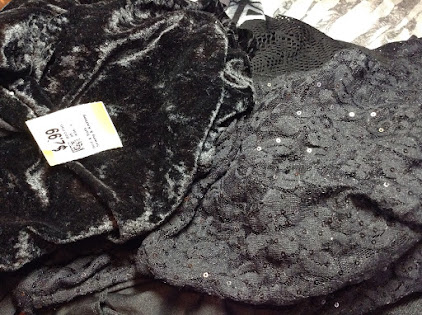
My process began with collecting odd bits and remnants of fabrics. No holes barred, I'll collect from any where. The black crushed velvet is from Value Village- 2 meters for 2.99. There is a lace and sequined top that never quite fit me right...
And a mixi skirt from the Sally Ann. The rest were scraps from previous projects.
Next, I merged together a few sweater patterns to come up with one I liked, similar to the inspiration piece but different enough that it's not a direct copy.
The original had some curves and organic lines in it but I opted for a straighter linear look.
I marked them with numbers,hash lines and very loose grain lines to help with cutting out and construction order.


This is what that all looked like.


Then I cut my pattern up into little pieces. It's a good thing I took pictures before I cut it up. I had to refer to them more then once!


I added 1/4 inch seam allowences as I went.


All the horizontal pieces were seamed first, then the vertical ones- just like in quilting. Things got a little hairy a few times but fortunately there was no seam ripping involved.


This is it before sleeves. It doesn't look like much I know!!!


Testing it out on the dolly lama.
Finally finished .... doing a little happy dance in the back alley!

From start to finish this probably only took me 4 hrs total to make. I used 8 different fabrics, putting a nice dent in the scrap box, and I upcycled 2 previously used garments!

I wore it to work the next day and and got many compliments, starting with the lady at the coffee shop and the gas station woman and Kathleen who works up stairs. My boss does not want me to shorten the sleeves because she likes to get my cast offs when I'm tired of them and she has long arms. My hubby has christened this my "witchy sweater"

Thanks for stopping by!

Maureen


Friday, 22 May 2015

More Burda skinnys.

Oops, I did it again! 6855 Burda.

I'm just loving this pattern! This is my fourth pair.

The print is a little wild, so my details get lost in it, but all the same I love this cotton twill with a wee bit of stretch. Just picked it up at Fabricana Imports.

White top stitching thread would have shown off the details better but my butt did not want all that attention. All the details are there - in black ,and this time I added rivets to the stress points with my Prym snap tool that I never shut up about!

This season I am having serious wardrobe issues. All my tops last summer were patterned and nothing goes with all the printed bottoms I've been making this year. Anyone else having this problem?

Thanks for stopping by.


Alabama Chanin Corset Top

A little slow stitching for me this weekend!
This is my first attempt with AC's Corset top. I use two men's medium sized t shirts I collected from the thrift store.
 
It turned out well and I really enjoyed making it while I sat outside enjoying the sunshine. But I have to say it's a bit racy for me and I will only wear it at home. I did a Google search and found that this looks really good on less busty women.
I learned a few things on this project I will regard for my next one.
I will make alterations so it fits better! The neckline was way too low and a bit wide through the shoulders. I threaded elastic through the neck and arms to bring it closer to the body. Once again I need to make Muslins!!!
The fabric was very thin so it offers zero support. Next time I will use a heavier knit or use a double thickness.
I needed to add a 3" flounce to accommodate my muffin top. I really like the addition. It's very feminine.
 
 
Last but not least , I will use a thimble!!!!!!! When I've joked in prior posts about sewing till my fingers were bleeding-I wasn't kidding. It's starting to heal but man that little sucker hurts like the dickens. I can't blame my injuries solely on this project. I have been diligently working on my AC style 4 panel skirt as well.

I call it AC style because it's her technique but my own designs.

I have yet to finish it, but it will be ready to wear this summer.
It started off quite organic. Just paint and reverse appliqué.
 
Then I decided to make it more of a sampler.

Experimenting with different styles of her work.
Then the beading happened.
And you know, now I just can't stop.
It's become one of those things when more is just not enough- does that make sense?
I need to let my pointer heal up a bit more and then I'll get back in the saddle again- because I can't wait to wear it.

Thanks for stopping by.

Your comments are welcomed.